macOS vs Windows privacy settings
A guide for new Mac owners
If you’re moving from Windows to Mac, you may be wondering where to find all of your macOS privacy settings. Adjusting the privacy settings on a Mac will be a little different from what you’re used to, but we’ve got you covered!
In this article, we’ll tell new Mac users where they can find the most important privacy settings on macOS.
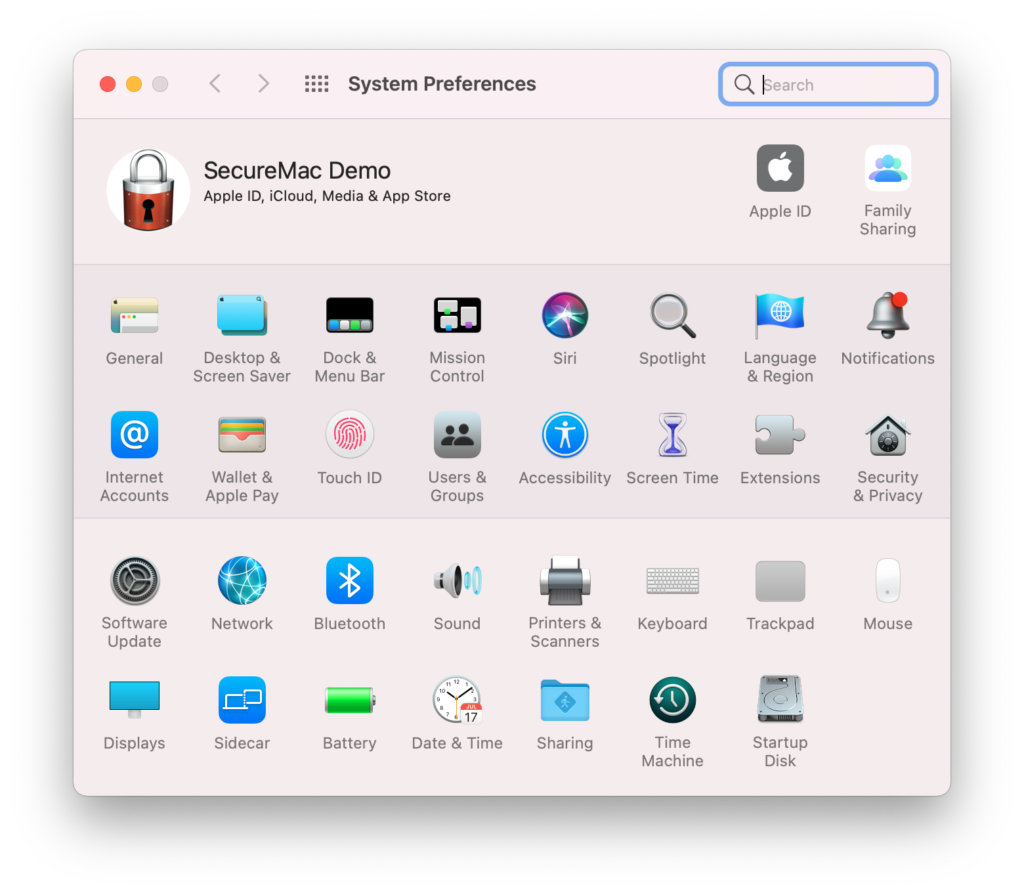
Note for Mac newbies: To make certain changes on a Mac, you may first have to click on the lock icon in the lower left-hand corner of the System Preferences panel and enter your admin password. If you’re trying to change a macOS setting and nothing is happening, this is probably why!
macOS Privacy Settings for Location Tracking
If you had a Windows laptop, you may have disabled location tracking for Windows 10 and/or for some of the third-party apps running on your system. As you probably recall, on Windows you did this by going to Start > Settings > General > Privacy > Location.
On a Mac, you can find all of the settings that you need to handle location access at Apple menu > System Preferences > Security & Privacy > Privacy > Location Services.
The macOS privacy settings for location are pretty straightforward: Any app that has ever asked for location data will show up on the right-hand side of this pane. To grant or revoke access for an individual app, just check or uncheck the box next to the app.
You can also turn off all location tracking on your Mac. You do this by unchecking the box next to the words Enable Location Services. However, remember that Find My — the Apple app that can be used to locate or remotely erase a lost or stolen Mac — needs to access Location Services in order to be fully functional. For most users, it may be best to restrict access on an app-by-app basis instead.
Creating Accounts for Different Users
If you’re sharing a computer with other people in your household, you should set up separate accounts for each user.
In Windows, you create new accounts by going to Start > Settings > Accounts > Family & other users.
On a Mac, it’s pretty similar. Head to Apple menu > System Preferences > Users & Groups. To add a new account, first click on the lock icon and enter your password. Then click on the little “+” at the bottom of the users menu.
When you create a new user, you’ll have to decide on the account type. You should only pick Administrator if you want the person to have full admin permissions on the Mac. Otherwise, pick Standard instead. Note that you can also create a Sharing Only account; this is a very limited account type that can only access files and folders that you specify.
It’s also worth mentioning something else here (even though it’s not really one of your macOS privacy settings). As a basic security measure, you should always create a Standard User account for yourself as well. Use this as your day-to-day account on the Mac. Without getting overly technical, we’ll just say that on macOS, processes typically run with the same level of access as the user that launched them. If you run into a malicious program, and that program executes from an Administrator account, it will have far greater access than it would have had on a Standard User account. Thus it’s a good idea to create a separate Standard account as your daily driver, and leave the Admin account for admin tasks only!
Restricting Mic and Camera Access
Mac users, just like Windows users, don’t always want to give every app on their system full access to their microphone or camera.
You probably already know how to see which apps can access the mic or the camera on a Windows computer. In Windows 10, you find this information by going to Start > Settings > General > Privacy, and then clicking on Camera or Microphone under App permissions.
On a Mac, you can find the same basic settings under Apple menu > System Preferences > Security & Privacy > Privacy. Click on either Camera or Microphone in the left-hand menu to see information about which apps can use what. Before an app is given camera or microphone access for the first time, it has to ask, so there shouldn’t be any surprises here. But this is where you can check — and control — which apps have access to your microphone or camera. If you ever want to revoke access for a particular app, simply uncheck the box next to the app’s name.
Opting Out of Ad Tracking
Tech companies love to track us so that they (and their friends) can sell us things. This kind of ad tracking is pervasive — and the fact that Apple is against it has become a major selling point for the company’s devices.
On Windows, you opted out of ad tracking by going to Start > Settings > General > Privacy. You may also have visited the Privacy Dashboard on Microsoft’s web portal as well.
Apple is a bit different from Microsoft when it comes to tracking its users for advertising purposes. They don’t share any personally identifiable information with third parties, and they try to protect user privacy by serving relevant ads without actually tracking you. It’s worth reading through their support page to learn exactly how Apple uses Apple Advertising data.
Nevertheless, many Mac users want to opt out completely. The good news is that it’s fairly easy to so.
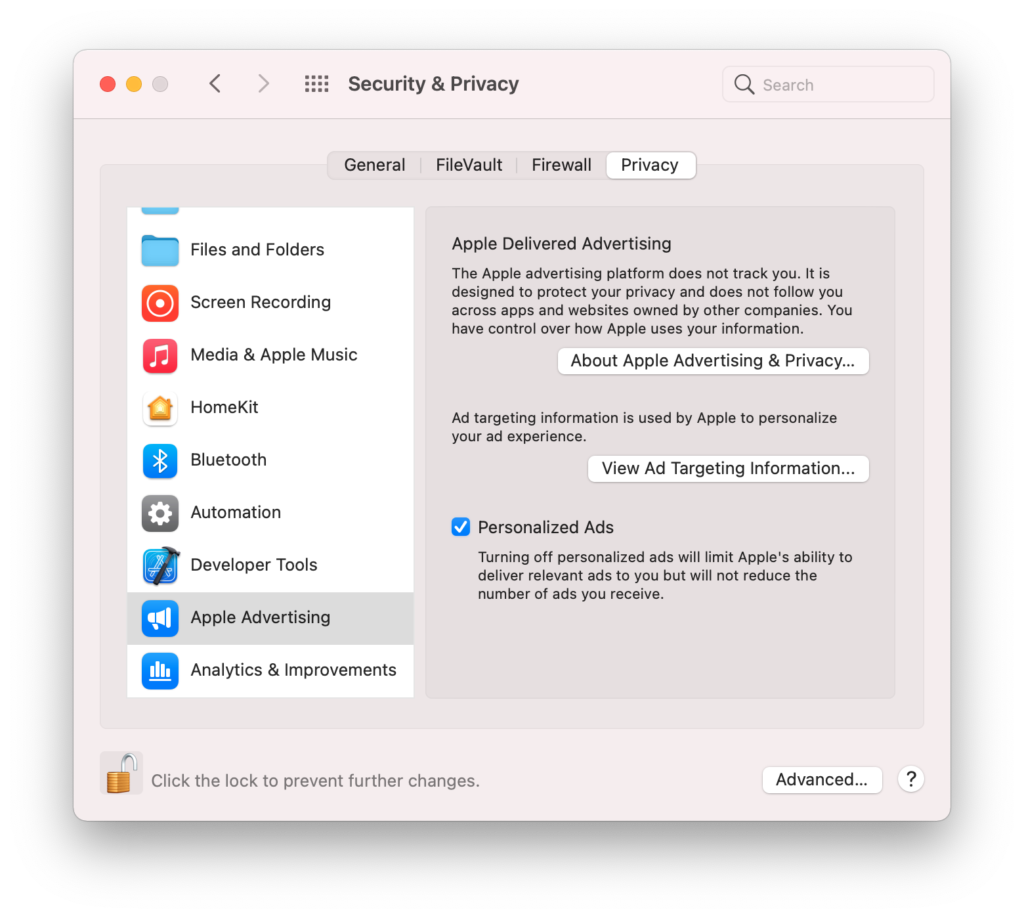
On a Mac, you go to Apple menu > System Preferences > Security & Privacy > Privacy > Apple Advertising. Uncheck the Personalized Ads box to opt out of ad personalization.
To opt out of location-based Apple advertising, go to Apple menu > System Preferences > Security & Privacy > Privacy > Location Services. Here you need to deselect News to opt out of Apple advertising based on your location.
Cortana vs Siri Controls
Lots of Windows users simply disable the Cortana digital assistant as a basic privacy measure. You can do the same thing with Siri, Apple’s digital assistant, but you may want to give it a chance first.
Unlike Cortana, Siri has always respected user privacy pretty well (with one or two lapses). And starting in macOS 12 Monterey, Siri will work offline too … no Internet connection required. For years, Apple has been investing in on-device machine learning. One of the effects of this is that Siri can now use your Mac’s local machine learning capabilities to improve its performance — without having to send data to Apple’s servers for processing.
On a Windows machine, it can be a little hard to fully disable Cortana. (And it sort of seems like Microsoft wants it this way!)
On a Mac, controlling Siri is considerably easier: Go to Apple menu > System Preferences > Siri.
If you want to stop using Siri altogether, uncheck the box next to the words Enable Ask Siri. Note that there is some overlap between Siri and the macOS voice input feature called Dictation. If you just turn Siri off, your Ask Siri data will remain on Apple’s servers so that Dictation can use it. To manually erase this, click the Delete Siri & Dictation History button. Dictation will still work, but Siri will be disabled, and the only voice input data stored on Apple’s servers going forward will be from Dictation.
If you only want to turn off voice-activation for Siri (“Hey Siri”), but still want to be able to use the digital assistant by clicking on the Siri icon, just uncheck Listen for “Hey Siri”.
More macOS privacy settings for Siri
There are two final macOS privacy settings related to Siri that you should know about.
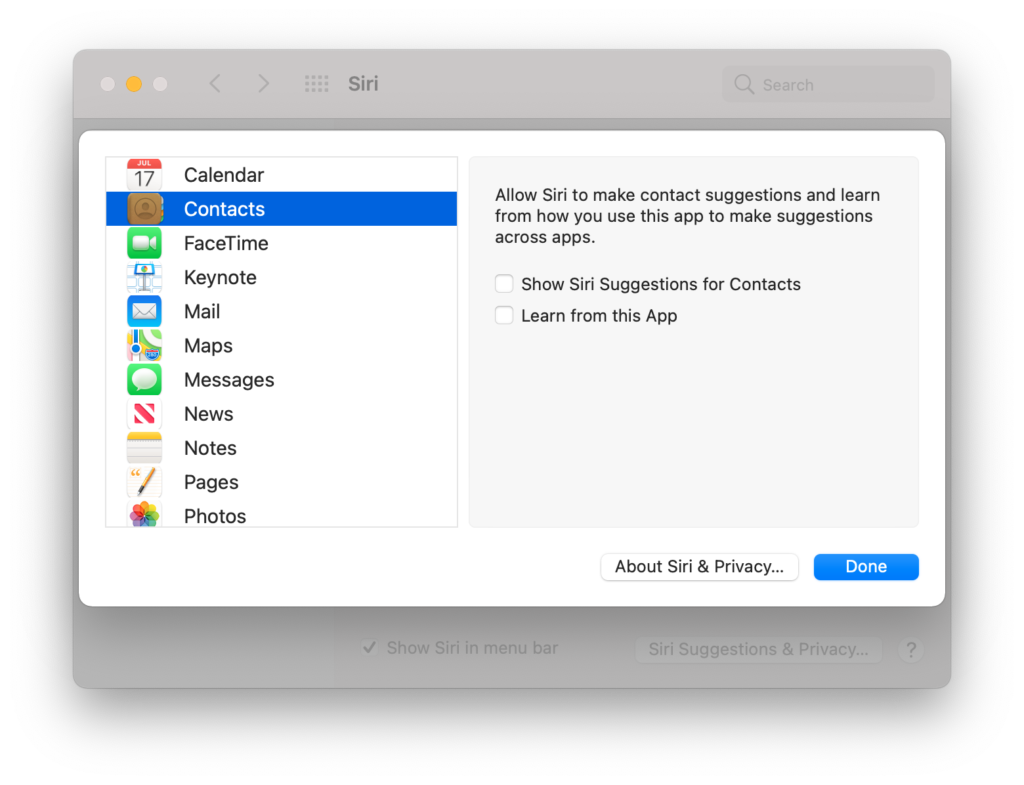
Siri is intended to help you use your device with greater ease. Because of this, it tries to learn how to anticipate your needs and give you relevant suggestions. But to do this, Siri needs access to what you’re doing in various apps on your Mac. If there are some apps that you don’t want Siri watching, you can toggle off Siri’s access to them on an app-by-app basis.
At the bottom of the Siri controls pane, click on Siri Suggestions & Privacy. Click on any app from the left-hand side of the pane to see your options. You can uncheck the box for Show Siri Suggestions and for Learn from this App if you want to restrict Siri’s permissions for the app.
One additional Siri privacy control to be aware of relates to how Apple analyzes Siri’s performance. Long story short, Apple sends some of your voice interactions with Siri to its developers in an attempt to make Siri better.
Your privacy is protected during this process, and the only reason Apple does this is so that they can make sure Siri is actually working the way it’s supposed to.
But if that still makes you uncomfortable, you can opt out. Go to Apple menu > System Preferences > Privacy > Analytics & Improvements. Uncheck the box next to Improve Siri & Dictation to stop sharing your audio interactions with Apple’s development teams.
Learning more …
If you’re just getting started with macOS, you may want to learn more about the world of Mac security. Here are three great places to start!
The Checklist is a weekly podcast by SecureMac about cybersecurity and digital privacy — made just for Mac users! It’s a fun, accessible way to keep up with the latest developments in Mac security. You can listen on our site, on Apple Podcasts, or on your favorite podcast app.
Our complete guide to VPNs for Mac users is an introduction to all things VPN. We cover what VPNs are, how they work, and how to use them. If you don’t have one of these essential security tools, give this guide a read!
SecureMac’s interview series features in-depth conversations with prominent figures in the infosec and Mac security communities. From Mac forensics experts to data breach gurus, professional social engineers to Hollywood actors, there’s something here for everyone.