Checklist 25: 5 Things to Know About Child-Proofing Your Mac
- Creating an account for your children.
- Effectively managing screen time.
- Browser-based restrictions.
- Manage app and email functionality with built-in controls.
- Keeping an eye on your kid’s social media.
With new generations growing up in an increasingly digital world, children are using computers and electronic devices in greater numbers than ever before. While this is excellent for the development of technological proficiency, it comes with a host of concerns for parents. The Internet is a large, diverse place, after all, full of information but also hazards and threats. Teaching proper computer usage habits takes time; it’s often best done in conjunction with fair and sensible controls on their computer activities. Luckily, Apple includes a robust suite of parental controls in macOS so that parents like you can make the decisions that are best for your family.
In this edition of The Checklist, we’ll look at five of the most important things to know about your Mac’s built-in parental controls and how you can effectively provide a safer computing environment for your child. Let’s begin by looking at the first step any parent should take when providing computer access to kids: creating a child’s user account.
Creating an account for your children. Providing your child with their own account on a family Mac is more than just a good way to monitor their behavior. Parents can use it as an opportunity to teach responsibility about computers and how to use them as well. Plus, for a young child, getting their own account on the computer can feel like a “big deal.” While you’ll put restrictions and rules in place, it’s still a chance for your kids to develop a sense of independence while improving computer usage skills.
So, let’s quickly walk you through the process of setting up their account; we’ll specifically discuss macOS Sierra here. From the System Preferences pane, locate the option labeled Parental Controls and click on it to open the next window. To use this screen, you’ll need to unlock it with your own username and password; this way, only you can make modifications to these options.
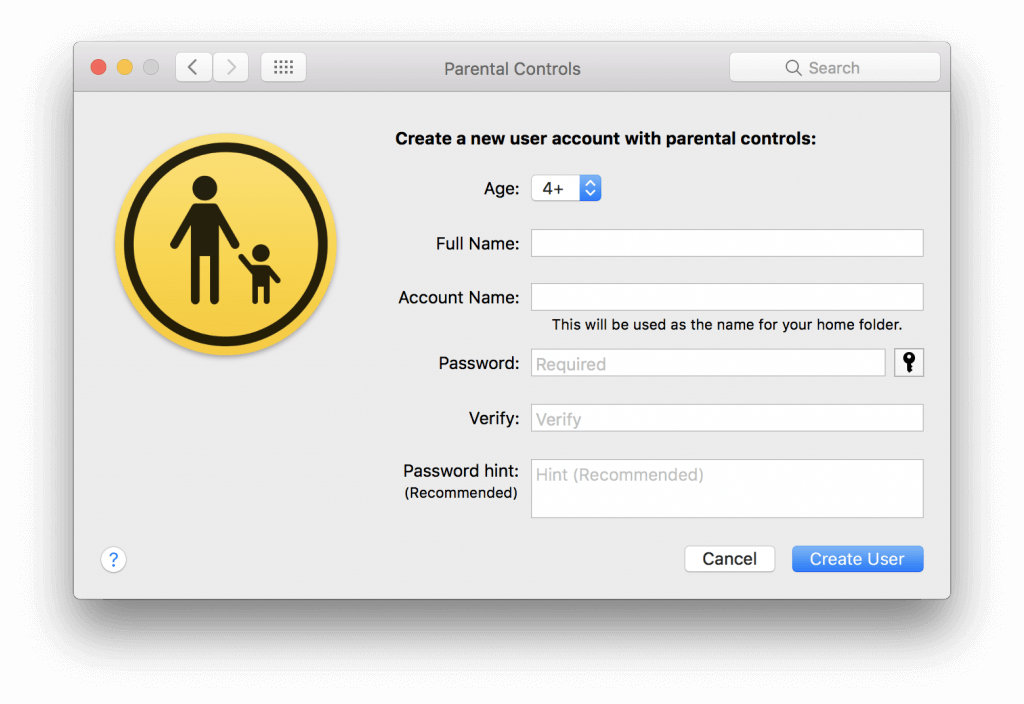
Select the plus icon to add a new user account to the Mac. Fill in the relevant details, including your child’s name, the account name you want for them, and finally a password they can use to log in to the account. Here’s another awesome opportunity to teach your kids while setting up your parental controls.
When you hand over the account password, talk to them about the basics of password security and how to keep their secret codes safe. When they move on to creating accounts for social media later, this is vital information they’ll need to remember. Starting early like this helps lay the groundwork for good usage habits later in life.
Effectively managing screen time. With the huge number of things one can do on the computer, it’s no wonder that kids sometimes spend hours and hours using them each day. While some of us might have grown up doing the same thing, it’s still wise — as parents — to think about limiting the amount of time they can use the computer each day. Schoolwork and the outdoors are just as important to their development as proficiency with computers, right? With that in mind, it’s simple to set up timers and limits on your Mac from the parental controls window you should already have open.
From this pane, click the “Time” tab on the bar at the top. Clicking on this option will give you access to some robust tools Apple has created for parents. You can choose to set up a custom schedule based on your child and your parenting style. For example, you can limit weekday use to just a few hours, but choose to provide more time on the weekends — or remove the restrictions altogether. It’s entirely up to you.
Want to make sure the kids stay in bed when they’re supposed to be sleeping, instead of using the computer? You can additionally restrict access to the machine altogether based on a time range. This feature can be very useful to turn on situationally as well. Managing screen time is much easier with this built-in tool.
Browser-based restrictions. Now, let’s discuss one of the more important roles of parental controls: keeping our kids safe on the web. There’s a ton of excellent content out there for children, and many resources that can help curious minds learn and engage with all kinds of new subjects. Maintaining access to those quality sites while weeding out all the harmful and inappropriate content is the challenge. Though there’s no shortage of third-party software for very fine control over what sites your child can visit, we’ll continue to look at what’s built-in to macOS Sierra. For most situations, it’s functions should be sufficient for most families.
So back to the parental controls window: click the Web tab now. You’ll see you have three options. The first is unfettered access to the web; this isn’t ideal unless you’re dealing with an older child who may be outgrowing parental controls altogether. The next option, “try to limit access,” will use a list of filters compiled by Apple to work to prevent your child from visiting any untoward websites.
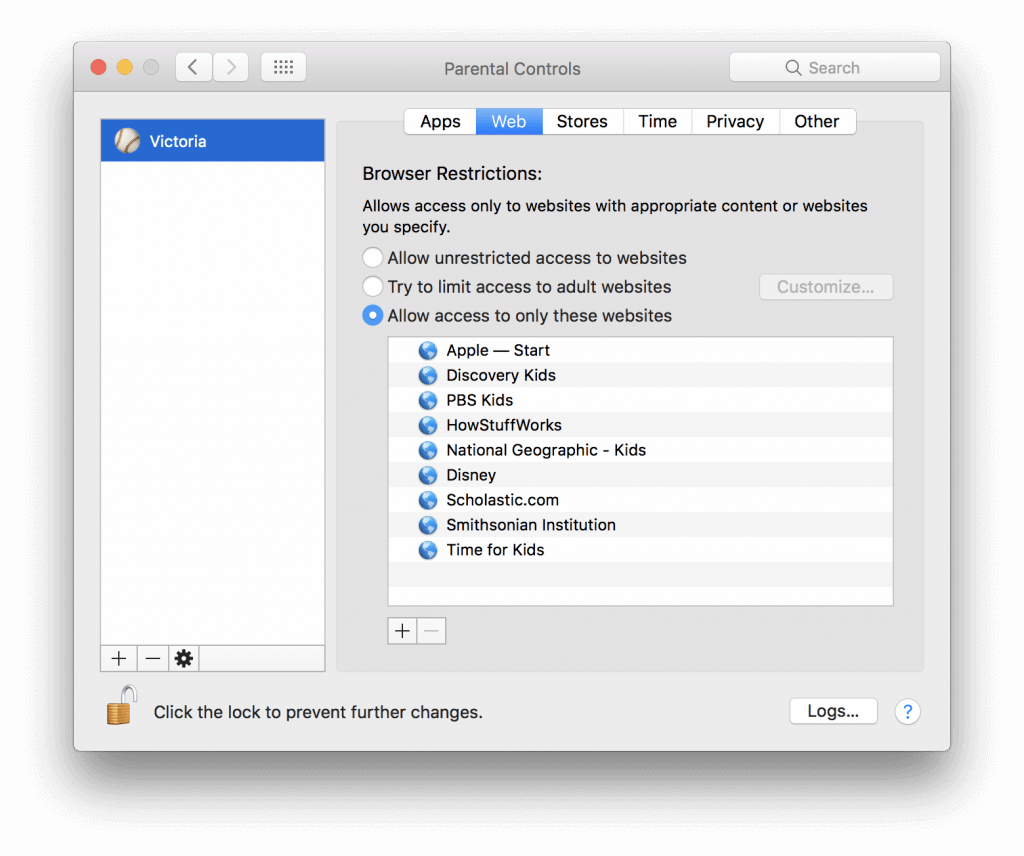
You can also choose to add your own additions to the blacklist if you discover any loopholes or know of something specific to block. You can also adjust whitelist settings. Overall, this setting will often be most effective. However, if you have very young children or a special situation, you can operate on a whitelist-only basis. This strict option will only allow websites you specify, and filter out all other sites and stop access to them.
One additional note: on this pane, you may notice the button labeled “Logs.” Click this, and you can easily see a list of all the sites your child has recently visited — as well as the ones blocked by the filter. This feature can enable you to stay informed and make parenting decisions as necessary.
Manage app and email functionality with built-in controls. As they use the Internet increasingly, your children will likely soon take an interest in having their own email account or begin chatting online with their friends. While a natural progression, you may want to take some precautions here as well. Monitoring these aspects of their activity can help you spot problems or issues before they become serious. Let’s click over to the Apps tab on parental controls now for a look at managing these features.
Broadly speaking, you can choose to limit your child’s access to certain apps relatively easily. Just select an age range restriction and put it in place. The age restriction will prevent any downloads or usage of apps that violate the rules. You may also take more specific action regarding listing specifically allowed apps. This is an excellent option when you’re introducing children to the computer; it’s easy to gradually expand the amount of software they’re allowed to use.
When you want to be careful about their initial introduction to email, this pane can be useful as well. Choose to restrict access to web-based email services like Gmail first, then set up a list of approved contacts for the Mail app. Your child’s user account will now only be able to communicate with those you’ve given your approval. When they want to email a friend, it’s easy to check with the other parents first. Then add the email to your list. This is about as far as the built-in controls can go regarding restricting communication, though.
Keeping an eye on your kid’s social media. A defining aspect of today’s Internet is the prevalence of social media. At some point, it’s a sure bet that your child will want to make an account. First, remember that for many social networking sites, it’s not permitted for users under the age of 13 to create accounts. We all know that rarely serves as a barrier, but it is worth remembering when trying to explain reasonable restrictions to your child.
Unfortunately, there’s no built-in way to manage or monitor activity on social media sites. We’re limited to blocking or allowing access altogether. Once again, there are third-party apps out there that could allow you to monitor how your child uses these sites. Some of these programs do amount to being “keyloggers,” though, so be aware of the potential ramifications when going down this route.
When your children are old enough to use social media, examine the privacy settings with them. Explain what they are, why they’re important, and how they should use them. Set some rules for their social media use. While your Mac can help you in many areas, this is one time where you’ll need to try some good old fashioned parenting first, and rely on technology second!
Parental controls work best with thoughtful planning and good communication. Let your child know that you’re putting these restrictions in place and why; that can help to make the entire situation easier to set up and execute. If you opt for a third-party program to augment your Mac’s capabilities, research these products closely to uncover which is best for your machine.
That wraps up another episode of The Checklist! If you’d like more information on the topic we covered today, or if there’s a specific topic you’d like to see featured on a future episode, send us an e-mail at checklist@securemac.com!
Next Read
 Security
Checklist 24: 5 Things to Know About Child-Proofing Your Kid’s iPhone
Just about everyone has a smartphone these days, and many parents see the benefits in providing their children...
February 16, 2017 • 9 min read Security
Why Protecting Your Child’s Identity Online Is Important
Parents raising kids today are at a disadvantage. Thanks to the internet and the advent of countless other...
November 27, 2015 • 3 min read Security
Checklist 149: Security Tripping with The Checklist
This week, we say hello to August with a groan as news of more big data breaches that...
August 8, 2019 • 10 min read Security
Checklist 200: TikTok, TV, and Time for a Checklist
On this week’s Checklist, we discuss a rapidly changing App Store story, we talk about streaming services and...
September 28, 2020 • 7 min read